Sunday, December 9, 2012

Updates and new junk food/sweets/dessert/Rilakkuma decoden iphone 4s phone case :D

Hello!!! It's been so long since I've updated  :) I've been very successful with my Etsy shop so far and I'm very grateful for all the sales! It's been keeping me extremely busy though, and with school I never have any free time anymore. But it's ok because I LOVE making nails! The feedback from my customers has been fantastic and I'm soooo happy that people seem to like my designs so much. When I started this, I never dreamed I would actually sell anything lol. I have to admit though, it is pretty cool having people tell you how awesome you are every day. LMAO
I love Etsy. I've also been doing some shopping there. I made a new phone case also, isn't it PRESH??? If you would like to know where I got any pieces just comment and I'll get back to you :) You can click on any pic to enlarge it. Well first, this is everything I WANTED to put on it:
I wish I could have fit it all :( I need to make a laptop case!


Not that you can see it, but the bottom is covered in pink and purple (Striped) whipped
cream clay and I basically just stuck everything in on top while it was wet.
It took a few days for it to dry completely because of all the stuff I put on it.
After it was dry there were a few loose pieces which I added E6000 under
so they don't come off!


You're not able to add phone charms to the iPhones so I created this charm thing and attached it to the star charm on the phone and reinforced it with some E6000 glue since it is quite heavy.
(Rilakkuma is actually a pen! With pink ink:))

This is the front part of the case. It's NOT completed yet. I've
ordered a bunch of Swarovski crystals that are taking forever to get here
so when they arrive the front will be EXTRA sparkly!. And yes, that is an
ice cream scoop on my home button. And a silhouette of a kitty loaf. and a bone on the top left,
and a NSFW on top right (Not Safe For Work) ;)


It's super heavy but I really don't care because everytime I look at it, I'm instantly in a good mood. I upgraded finally to the iphone 4s (which i'm really liking so far) so I had to make a new phone case. A big step up from the last one!

Friday, September 28, 2012

Easy Peasy Mini/Small/Tiny 3 petal polymer clay fimo rose tutorial/how to

I recently bought a bunch of blocks of polymer clay (fimo and sculpey) so I could start making my own nail art decorations. Specifically roses...and whatever else I can learn to do. I was very surprised to see a lack of online tutorials about nail-size roses. All I could find were the larger roses and stuff about fimo canes (which I don't really use). So I tried making those 7 petal roses but smaller, and I was having a lot of trouble and they looked like crap. I realized I didn't need to try to squeeze so many petals onto such a small rose. So after practicing I came up with an easy method to make small roses. *Disclaimer* I'm sure there's other ways of doing this, and I'm not saying this is the correct way, but it works for me. After the first couple I was flying and had about 30 roses in 10 minutes. So if you're having trouble with roses like I was, I hope this helps!


 First, start out with a small ball of clay, about the size you want your rose to be. Mine is about the size of 2 peas put together.

Next you want to roll your clay into a snake. Mine was 3 inches :)


Cut your snake into 4 pieces, but make one piece smaller than the others, about half the size maybe. The small piece will be the center of your rose.


 Flatten the small piece, not too thin so it rips though.


Next, roll the flattened piece into a spiral like this
-------------------------------------------->>>>>>>


Then you want to take the other 3 pieces you cut and flatten them at the top  so the look like the shapes above-almost like an ice cream cone. These will be your petals.They don't have to be perfect. The bottom "cone" part will be removed at the end anyway. 

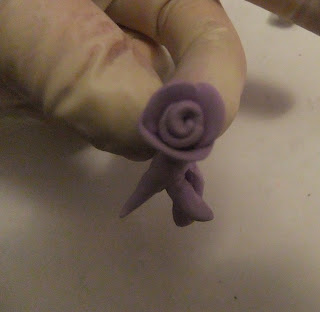
Wrap your first petal around the center rosebud, the spiral part you made.
Next, wrap the second petal, slightly overlapping the first. Do the same thing with the third petal:


If you want, you can lightly pinch the outer petals with your fingers and fan them out a bit to make the rose a little more realistic looking.
The bottom of your rose should look something like this ^^

Cut it off, and try to keep the bottom as flat as you can so it rests on your nails better.

Voila! Your rose should look something like these ^ Not perfect, but they're cute.  If yours look like crap, keep trying! Practice makes perfect, I promise!
I used my roses on my fairy kei/lolita/gyaru/kawaii/Japanese/hime/princess 3d nail art: Or whatever you wanna call it :) lol!
Pretty, yeah?

Tuesday, September 4, 2012

3D nails fo' sale

Wow it's been a while since I posted anything. It's so hard to find time for this stuff right now. Not sure anyone reads it anyway LOL.
So to make some extra money I decided to start selling my nail designs on Etsy. I'm reallyyy happy with the deigns I've been coming up with, my nail art has really improved a lot! I've already sold 3 sets of nails and lots more people have my nails on their "favorites" lists! Check it out!

Friday, August 31, 2012

Wow it's been a while since I posted anything. It's so hard to find time for this stuff right now. Not sure anyone reads it anyway LOL.
So to make some extra money I decided to start selling my nail designs on ebay. I'm reallyyy happy with the deigns I've been coming up with, my nail art has really improved a lot! I've already sold 3 sets of nails and lots more people have my nails on their "watch" lists! Check it out HERE I was just seeing so many nails on ebay that were just so overpriced and not that cute. There are some cute nails, but you have to order them from Japan/Korea. So I think I have an advantage, because I have nothing up over $15 and mine are super cute (I'm not conceited, they are!!) Here are some samples of what I have up:


This is actually the most popular set I have up.


"Corset"nails :)

This is the very firse set of 20 I sold! :))))


 Anyway, I'm really hoping they do well. I know these styles aren't for everyone, but that's what ebay's for, right?

Monday, July 30, 2012

Criss-cross Gradient Overlay Nails

I actually didn't really care for these nails when I first did them. But they are starting to grow on me :)
It was an experimental design. I created a mini-tutorial below; they were actually super easy to do, but took a little time to wait for the polishes to dry.
1. I started out by doing a gradient design with a sponge. You can use any 2 contrasting colors you want, I chose a light peachy pink and a bright hot pink because I like the way they looked with the black. To do a gradient design, first I painted my nails with the lighter color pink. Then I took a makeup sponge with a flat side and painted some of the hot pink mixed with a bit of the light pink onto it. I started tapping the nail about halfway down. When that was nearly dry I took the sponge again with only the hot pink polish and tapped it on the last 1/4th of the nail (the very tip).


2. When they were completely dry I took some striping tape and made 3 criss-cross, or X's down the center of the nail.


3. Next I used a black polish with silver sparkles and painted the entire nail, right over the tape.


4. After it was completely dry, I carefully removed the striping tape. Voila!


5. (Optional) Last I added a dark rhinestone to the center of the middle X. In the center of the top and bottom X's I added a silver microbead(on the ring finger I just used 3 rhinestones). They didn't show up too well in the photos though. Finally I stuck a light purple bow on the thumb because somehow my polish ended up purple-ish looking, no idea how that happened lol... Finished with a top coat of Seche Vite. :)


I wanted to add a bow to the ring finger, but then I started having flashbacks of when my nails were getting stuck on everything & tangled in my hair when I ingeniously glued bows and flowers all over them the last time. <sigh>
Anyways...thanks for reading :)

Saturday, July 21, 2012

MYO Makeup Pigments from Ebay - Soul Set

I have been wanting to try some pigment eyeshadow for a while now. My budget does not allow me any high-end makeup to play around with right now(only the basics! ;) so I thought I'd give one of these online indie brands a shot! I looked at a few and their order times were so long, some were almost a month! And others were way too expensive for 1 color. So I turned to ebay (what did you expect from me?). I was looking for a small set of pigments at a reasonable price. I ordered a couple from China, I think 12 pigments for like $2 lol, but those haven't arrived yet. I found these:
 The brand is called MYO and I purchased them HERE.
They arrived quickly, another pleasant surprise. The containers are small, but not tiny. The makeup is pigmented enough to where these will last a regular person a very long time! You do NOT need that much of these! Applied over a good primer (I prefer UD Primer Potion) these will last all day. Two of the colors are matte, the bright blue and the black. The other 8 are shimmery, some more than others.


One of my favorites (not the yellow:)

I did not use any primer under the swatches


 If you're a fan of the Urban Decay Sustainable Palette (the bamboo one) you may recognize some of these. 4 of the colors are pretty close, less glittery dupes of YDK, Half-Baked, Kiddie Pool and Flipside. Which is fine with me because I loved the shit out of that palette and hit pan on every color, they're pretty much gone. So I was very pleasantly surprised by this palette! This is called the "Soul" set btw, there are a few more, including a super bright set! I chose this because I wanted a shimmery lilac/violet and a shimmery taupe/brown color. And I wasn't disappointed. I recommend this for anyone on a budget, a great buy.

Lens Giveaway!

Want to win a pair of lenses?? Not just any lenses, but Uniqso lenses! Uniqso is my favorite place to shop for lenses. Not only is their iFairy selection huge, but they are so friendly and helpful. A great lens shop! The blog, LBD and Onesies is hosting a lens giveaway, its really easy to sign up!